Step1 加入SpringWeb的依赖

1
2
3
4
5
6
7
<!-- spring 依赖 -->
<dependency>
<groupId>org.springframework</groupId>
<artifactId>spring-core</artifactId>
<version>5.2.9.RELEASE</version>
<scope>provided</scope>
</dependency>

Step2 书写一个RestController

1
2
3
4
5
6
7
8
9
10
11
12
13
14
15
16
17
18
19
20
21
22
23
24
25
26
27
28
29
30
31
32
33
34
35
36
package com.github.hezhangjian.demo.agent.test.controller;

import com.github.hezhangjian.demo.agent.test.module.rest.CreateJobReqDto;
import com.github.hezhangjian.demo.agent.test.module.rest.CreateJobRespDto;
import lombok.extern.slf4j.Slf4j;
import org.springframework.http.HttpStatus;
import org.springframework.http.ResponseEntity;
import org.springframework.web.bind.annotation.PathVariable;
import org.springframework.web.bind.annotation.PutMapping;
import org.springframework.web.bind.annotation.RequestBody;
import org.springframework.web.bind.annotation.RestController;

/**
* @author hezhangjian
*/
@Slf4j
@RestController
public class TestController {

/**
* @param jobId
* @param createJobReqDto
* https://docs.aws.amazon.com/iot/latest/apireference/API_CreateJob.html
* curl -X PUT -H 'Content-Type: application/json' 127.0.0.1:8080/jobs/111 -d '{"description":"description"}' -iv
* @return
*/
@PutMapping(path = "/jobs/{jobId}")
public ResponseEntity<CreateJobRespDto> createJob(@PathVariable("jobId") String jobId, @RequestBody CreateJobReqDto createJobReqDto) {
final CreateJobRespDto jobRespDto = new CreateJobRespDto();
createJobReqDto.setDescription("description");
createJobReqDto.setDocument("document");
return new ResponseEntity<>(jobRespDto, HttpStatus.CREATED);
}

}

ReqDto:

1
2
3
4
5
6
7
8
9
10
11
12
13
14
15
16
17
18
19
package com.github.hezhangjian.demo.agent.test.module.rest;

import lombok.Data;

/**
* @author hezhangjian
*/
@Data
public class CreateJobReqDto {

private String description;

private String document;

public CreateJobReqDto() {
}

}

RespDto:

1
2
3
4
5
6
7
8
9
10
11
12
13
14
15
16
17
18
19
20
21
package com.github.hezhangjian.demo.agent.test.module.rest;

import lombok.Data;

/**
* https://docs.aws.amazon.com/iot/latest/apireference/API_CreateJob.html
* @author hezhangjian
*/
@Data
public class CreateJobRespDto {

private String description;

private String jobArn;

private String jobId;

public CreateJobRespDto() {
}
}

Step3 在AgentTransformer中织入切面的逻辑

1
2
3
4
5
6
7
8
9
10
11
12
13
14
15
16
17
18
19
20
21
22
23
24
25
26
27
28
29
30
31
32
33
34
35
36
37
38
39
40
41
42
43
44
45
46
package com.github.hezhangjian.demo.agent;

import com.github.hezhangjian.demo.agent.interceptor.RestControllerInterceptor;
import net.bytebuddy.agent.builder.AgentBuilder;
import net.bytebuddy.asm.Advice;
import net.bytebuddy.description.type.TypeDescription;
import net.bytebuddy.dynamic.DynamicType;
import net.bytebuddy.matcher.ElementMatchers;
import net.bytebuddy.utility.JavaModule;
import org.slf4j.Logger;
import org.slf4j.LoggerFactory;
import org.springframework.web.bind.annotation.DeleteMapping;
import org.springframework.web.bind.annotation.GetMapping;
import org.springframework.web.bind.annotation.PatchMapping;
import org.springframework.web.bind.annotation.PostMapping;
import org.springframework.web.bind.annotation.PutMapping;
import org.springframework.web.bind.annotation.RequestMapping;

/**
* @author hezhangjian
*/
public class AgentTransformer implements AgentBuilder.Transformer {

private static final Logger log = LoggerFactory.getLogger(AgentTransformer.class);

@Override
public DynamicType.Builder<?> transform(DynamicType.Builder<?> builder, TypeDescription typeDescription, ClassLoader classLoader, JavaModule javaModule) {
try {
//包名放在com.github.hezhangjian.demo.agent.test.controller下视为controller代码
if (typeDescription.getTypeName().startsWith("com.github.hezhangjian.demo.agent.test.controller")) {
final Advice advice = Advice.to(RestControllerInterceptor.class);
return builder.visit(advice
.on(ElementMatchers.isAnnotatedWith(RequestMapping.class)
.or(ElementMatchers.isAnnotatedWith(GetMapping.class))
.or(ElementMatchers.isAnnotatedWith(PostMapping.class))
.or(ElementMatchers.isAnnotatedWith(PutMapping.class))
.or(ElementMatchers.isAnnotatedWith(DeleteMapping.class))
.or(ElementMatchers.isAnnotatedWith(PatchMapping.class))));
}
} catch (Exception e) {
log.error("error is ", e);
}
return builder;
}

}

Step4 先添加一个打印日志工具类

Interceptor中不能出现和controller一样的字段,我们先写一个工具类用来agent打印日志

1
2
3
4
5
6
7
8
9
10
11
12
13
14
15
16
17
18
19
20
21
22
23
24
25
26
27
28
29
30
31
32
33
34
35
36
37
38
39
40
41
42
43
44
45
46
47
48
49
50
51
52
53
54
55
56
57
58
59
60
61
62
63
64
65
66
67
68
69
70
71
72
73
74
75
76
77
78
79
80
81
82
83
84
85
86
87
88
89
90
91
92
93
94
95
96
97
98
99
100
101
102
103
104
105
106
107
108
109
110
111
112
113
114
115
116
117
118
119
120
121
122
123
124
125
126
127
128
129
130
131
132
133
134
135
136
137
138
139
140
141
142
143
144
145
146
147
148
149
150
151
152
153
154
155
156
157
158
159
160
161
162
163
164
165
166
167
168
169
170
171
172
173
174
175
176
177
178
179
180
181
182
183
184
185
186
187
188
189
190
191
192
193
194
195
196
197
198
199
200
201
202
203
204
205
206
207
208
209
210
211
212
213
214
215
216
217
218
219
220
221
222
223
224
225
226
227
228
229
230
231
232
233
234
235
236
237
238
239
240
241
242
243
244
245
246
247
248
249
250
251
252
253
254
255
256
257
258
259
260
261
262
263
264
265
266
267
268
269
270
271
272
273
274
275
276
277
278
279
280
281
282
283
284
285
286
287
288
289
290
291
292
293
294
295
296
297
298
299
300
301
302
303
304
305
306
307
308
309
310
311
312
313
314
315
316
317
318
319
320
321
322
323
324
325
326
327
328
329
package com.github.hezhangjian.demo.agent.util;

import org.slf4j.Logger;
import org.slf4j.LoggerFactory;
import org.slf4j.Marker;

/**
* @author hezhangjian
*/
public class AgentUtil {

private static final Logger log = LoggerFactory.getLogger(AgentUtil.class);

/**
* Log a message at the TRACE level.
*
* @param msg the message string to be logged
*/
public static void trace(String msg) {
log.trace(msg);
}

/**
* Log a message at the TRACE level according to the specified format
* and argument.
* <p/>
* <p>This form avoids superfluous object creation when the logger
* is disabled for the TRACE level. </p>
*
* @param format the format string
* @param arg the argument
*/
public static void trace(String format, Object arg) {
log.trace(format, arg);
}

/**
* Log a message at the TRACE level according to the specified format
* and arguments.
* <p/>
* <p>This form avoids superfluous object creation when the logger
* is disabled for the TRACE level. </p>
*
* @param format the format string
* @param arg1 the first argument
* @param arg2 the second argument
*/
public static void trace(String format, Object arg1, Object arg2) {
log.trace(format, arg1, arg2);
}

/**
* Log a message at the TRACE level according to the specified format
* and arguments.
* <p/>
* <p>This form avoids superfluous string concatenation when the logger
* is disabled for the TRACE level. However, this variant incurs the hidden
* (and relatively small) cost of creating an <code>Object[]</code> before invoking the method,
* even if this logger is disabled for TRACE. The variants taking {@link #trace(String, Object) one} and
* {@link #trace(String, Object, Object) two} arguments exist solely in order to avoid this hidden cost.</p>
*
* @param format the format string
* @param arguments a list of 3 or more arguments
*/
public static void trace(String format, Object... arguments) {
log.trace(format, arguments);
}

/**
* Log an exception (throwable) at the TRACE level with an
* accompanying message.
*
* @param msg the message accompanying the exception
* @param t the exception (throwable) to log
*/
public static void trace(String msg, Throwable t) {
log.trace(msg, t);
}

/**
* Log a message at the DEBUG level.
*
* @param msg the message string to be logged
*/
public static void debug(String msg) {
}

/**
* Log a message at the DEBUG level according to the specified format
* and argument.
* <p/>
* <p>This form avoids superfluous object creation when the logger
* is disabled for the DEBUG level. </p>
*
* @param format the format string
* @param arg the argument
*/
public static void debug(String format, Object arg) {
}

/**
* Log a message at the DEBUG level according to the specified format
* and arguments.
* <p/>
* <p>This form avoids superfluous object creation when the logger
* is disabled for the DEBUG level. </p>
*
* @param format the format string
* @param arg1 the first argument
* @param arg2 the second argument
*/
public static void debug(String format, Object arg1, Object arg2) {
}

/**
* Log a message at the DEBUG level according to the specified format
* and arguments.
* <p/>
* <p>This form avoids superfluous string concatenation when the logger
* is disabled for the DEBUG level. However, this variant incurs the hidden
* (and relatively small) cost of creating an <code>Object[]</code> before invoking the method,
* even if this logger is disabled for DEBUG. The variants taking
* {@link #debug(String, Object) one} and {@link #debug(String, Object, Object) two}
* arguments exist solely in order to avoid this hidden cost.</p>
*
* @param format the format string
* @param arguments a list of 3 or more arguments
*/
public static void debug(String format, Object... arguments) {
}

/**
* Log an exception (throwable) at the DEBUG level with an
* accompanying message.
*
* @param msg the message accompanying the exception
* @param t the exception (throwable) to log
*/
public static void debug(String msg, Throwable t) {
}

/**
* Log a message at the INFO level.
*
* @param msg the message string to be logged
*/
public static void info(String msg) {
}

/**
* Log a message at the INFO level according to the specified format
* and argument.
* <p/>
* <p>This form avoids superfluous object creation when the logger
* is disabled for the INFO level. </p>
*
* @param format the format string
* @param arg the argument
*/
public static void info(String format, Object arg) {
}

/**
* Log a message at the INFO level according to the specified format
* and arguments.
* <p/>
* <p>This form avoids superfluous object creation when the logger
* is disabled for the INFO level. </p>
*
* @param format the format string
* @param arg1 the first argument
* @param arg2 the second argument
*/
public static void info(String format, Object arg1, Object arg2) {
}

/**
* Log a message at the INFO level according to the specified format
* and arguments.
* <p/>
* <p>This form avoids superfluous string concatenation when the logger
* is disabled for the INFO level. However, this variant incurs the hidden
* (and relatively small) cost of creating an <code>Object[]</code> before invoking the method,
* even if this logger is disabled for INFO. The variants taking
* {@link #info(String, Object) one} and {@link #info(String, Object, Object) two}
* arguments exist solely in order to avoid this hidden cost.</p>
*
* @param format the format string
* @param arguments a list of 3 or more arguments
*/
public static void info(String format, Object... arguments) {
}

/**
* Log an exception (throwable) at the INFO level with an
* accompanying message.
*
* @param msg the message accompanying the exception
* @param t the exception (throwable) to log
*/
public static void info(String msg, Throwable t) {
}

/**
* Log a message at the WARN level.
*
* @param msg the message string to be logged
*/
public static void warn(String msg) {
}

/**
* Log a message at the WARN level according to the specified format
* and argument.
* <p/>
* <p>This form avoids superfluous object creation when the logger
* is disabled for the WARN level. </p>
*
* @param format the format string
* @param arg the argument
*/
public static void warn(String format, Object arg) {
}

/**
* Log a message at the WARN level according to the specified format
* and arguments.
* <p/>
* <p>This form avoids superfluous string concatenation when the logger
* is disabled for the WARN level. However, this variant incurs the hidden
* (and relatively small) cost of creating an <code>Object[]</code> before invoking the method,
* even if this logger is disabled for WARN. The variants taking
* {@link #warn(String, Object) one} and {@link #warn(String, Object, Object) two}
* arguments exist solely in order to avoid this hidden cost.</p>
*
* @param format the format string
* @param arguments a list of 3 or more arguments
*/
public static void warn(String format, Object... arguments) {
}

/**
* Log a message at the WARN level according to the specified format
* and arguments.
* <p/>
* <p>This form avoids superfluous object creation when the logger
* is disabled for the WARN level. </p>
*
* @param format the format string
* @param arg1 the first argument
* @param arg2 the second argument
*/
public static void warn(String format, Object arg1, Object arg2) {
}

/**
* Log an exception (throwable) at the WARN level with an
* accompanying message.
*
* @param msg the message accompanying the exception
* @param t the exception (throwable) to log
*/
public static void warn(String msg, Throwable t) {
}

/**
* Log a message at the ERROR level.
*
* @param msg the message string to be logged
*/
public static void error(String msg) {
}

/**
* Log a message at the ERROR level according to the specified format
* and argument.
* <p/>
* <p>This form avoids superfluous object creation when the logger
* is disabled for the ERROR level. </p>
*
* @param format the format string
* @param arg the argument
*/
public static void error(String format, Object arg) {
}

/**
* Log a message at the ERROR level according to the specified format
* and arguments.
* <p/>
* <p>This form avoids superfluous object creation when the logger
* is disabled for the ERROR level. </p>
*
* @param format the format string
* @param arg1 the first argument
* @param arg2 the second argument
*/
public static void error(String format, Object arg1, Object arg2) {
}

/**
* Log a message at the ERROR level according to the specified format
* and arguments.
* <p/>
* <p>This form avoids superfluous string concatenation when the logger
* is disabled for the ERROR level. However, this variant incurs the hidden
* (and relatively small) cost of creating an <code>Object[]</code> before invoking the method,
* even if this logger is disabled for ERROR. The variants taking
* {@link #error(String, Object) one} and {@link #error(String, Object, Object) two}
* arguments exist solely in order to avoid this hidden cost.</p>
*
* @param format the format string
* @param arguments a list of 3 or more arguments
*/
public static void error(String format, Object... arguments) {
}

/**
* Log an exception (throwable) at the ERROR level with an
* accompanying message.
*
* @param msg the message accompanying the exception
* @param t the exception (throwable) to log
*/
public static void error(String msg, Throwable t) {
}

}

Step5 书写Interceptor切入方法

1
2
3
4
5
6
7
8
9
10
11
12
13
14
15
16
17
18
19
20
21
22
23
24
25
26
27
28
29
30
31
32
33
34
35
36
37
38
39
40
41
42
43
44
45
46
47
48
49
50
51
52
53
54
55
package com.github.hezhangjian.demo.agent.interceptor;

import com.fasterxml.jackson.databind.node.ArrayNode;
import com.fasterxml.jackson.databind.node.ObjectNode;
import com.github.hezhangjian.demo.agent.util.AgentJacksonUtil;
import com.github.hezhangjian.demo.agent.util.AgentUtil;
import net.bytebuddy.asm.Advice;
import org.springframework.http.ResponseEntity;

import java.lang.reflect.Method;

/**
* @author hezhangjian
*/
public class RestControllerInterceptor {

private static final ThreadLocal<Long> costThreadLocal = new ThreadLocal<>();

/**
* #t Class名 ex: com.github.hezhangjian.demo.agent.test.controller.TestController
* #m Method名 ex: createJob
* #d Method描述 ex: (Ljava/lang/String;Lcom/github/hezhangjian/demo/agent/test/module/rest/CreateJobReqDto;)Lorg/springframework/http/ResponseEntity;
* #s 方法签名 ex: (java.lang.String,com.github.hezhangjian.demo.agent.test.module.rest.CreateJobReqDto)
* #r 返回类型 ex: org.springframework.http.ResponseEntity
*
* @param signature
*/
@Advice.OnMethodEnter
public static void enter(@Advice.Origin("#t #m") String signature) {
AgentUtil.info("[{}]", signature);
}

/**
* @param method 方法名
* @param args
* @param result
* @param thrown
*/
@SuppressWarnings("rawtypes")
@Advice.OnMethodExit(onThrowable = Throwable.class)
public static void exit(@Advice.Origin Method method, @Advice.AllArguments Object[] args,
@Advice.Return Object result, @Advice.Thrown Throwable thrown) {
AgentUtil.debug("method is [{}]", method);
final ArrayNode arrayNode = AgentJacksonUtil.createArrayNode();
for (Object arg : args) {
arrayNode.add(AgentJacksonUtil.toJson(arg));
}
final ObjectNode objectNode = AgentJacksonUtil.createObjectNode();
objectNode.set("args", arrayNode);
ResponseEntity responseEntity = (ResponseEntity) result;
AgentUtil.info("status code is [{}] args is [{}] result is [{}]", responseEntity.getStatusCode(), objectNode, responseEntity.getBody());
}


}

curl命令调用查看效果

1
2
2020-12-31,17:52:01,528+08:00(6121):INFO{}[http-nio-8080-exec-1#39]com.github.hezhangjian.demo.agent.util.AgentUtil.info(AgentUtil.java:167)-->[com.github.hezhangjian.demo.agent.test.controller.TestController createJob]
2020-12-31,17:52:01,544+08:00(6137):INFO{}[http-nio-8080-exec-1#39]com.github.hezhangjian.demo.agent.util.AgentUtil.info(AgentUtil.java:200)-->status code is [201 CREATED] args is [{"args":["\"111\"","{\"description\":\"description\",\"document\":\"document\"}"]}] result is [CreateJobRespDto(description=null, jobArn=null, jobId=null)]

创建一个java maven工程

Step1 添加bytebuddy及日志依赖

1
2
3
4
5
6
7
8
9
10
11
12
13
14
15
16
17
18
19
20
21
22
<dependencies>
<dependency>
<groupId>org.springframework</groupId>
<artifactId>spring-web</artifactId>
<version>5.2.9.RELEASE</version>
<scope>provided</scope>
</dependency>

<!-- 字节码 注入 -->
<dependency>
<groupId>net.bytebuddy</groupId>
<artifactId>byte-buddy</artifactId>
<version>1.10.19</version>
</dependency>

<dependency>
<groupId>org.slf4j</groupId>
<artifactId>slf4j-api</artifactId>
<version>1.7.30</version>
<scope>provided</scope>
</dependency>
</dependencies>

Step2 书写Agent的入口处

agent有两个入口函数,分别是premain和agentmain,用于两种启动场景-javaagent启动场景和attach启动场景,我们这里先书写-javaagent启动场景

1
2
3
4
5
6
7
8
9
10
11
12
13
14
15
16
17
18
19
20
21
22
23
24
25
26
27
28
29
30
31
32
33
34
35
36
37
38
39
40
41
42
43
44
45
46
47
48
49
package com.github.hezhangjian.demo.agent;

import net.bytebuddy.ByteBuddy;
import net.bytebuddy.agent.builder.AgentBuilder;
import net.bytebuddy.matcher.ElementMatchers;
import org.slf4j.Logger;
import org.slf4j.LoggerFactory;

import java.lang.instrument.Instrumentation;

import static net.bytebuddy.matcher.ElementMatchers.nameStartsWith;

/**
* @author hezhangjian
*/
public class AgentMain {

private static final Logger log = LoggerFactory.getLogger(AgentMain.class);

/**
* call on -javaagnet
* @param agentArgs
* @param inst
*/
public static void premain(String agentArgs, Instrumentation inst) {
System.out.println("start agent premain");
final ByteBuddy byteBuddy = new ByteBuddy();
new AgentBuilder.Default(byteBuddy)
//这些类都是常见的无需切面注入的类,忽略掉可以提升agent加载速度
.ignore(nameStartsWith("net.bytebuddy.")
.or(nameStartsWith("org.slf4j.")
.or(nameStartsWith("org.apache.logging.")
.or(nameStartsWith("org.groovy."))
.or(nameStartsWith("javassist"))
.or(nameStartsWith(".asm."))
.or(nameStartsWith("sun.reflect"))
.or(ElementMatchers.isSynthetic()))))
//你想切面的包名
.type(ElementMatchers.nameStartsWith("com.github.hezhangjian.agent.test"))
.transform(new AgentTransformer())
.with(AgentBuilder.RedefinitionStrategy.RETRANSFORMATION)
.installOn(inst);
}

public static void agentmain(String agentArgs, Instrumentation inst) {
System.out.println("start agent main");
}

}

这个时候Transform先书写一个空实现

1
2
3
4
5
6
7
8
9
10
11
12
13
14
15
16
17
18
19
package com.github.hezhangjian.demo.agent;

import net.bytebuddy.agent.builder.AgentBuilder;
import net.bytebuddy.description.type.TypeDescription;
import net.bytebuddy.dynamic.DynamicType;
import net.bytebuddy.utility.JavaModule;

/**
* @author hezhangjian
*/
public class AgentTransformer implements AgentBuilder.Transformer{

@Override
public DynamicType.Builder<?> transform(DynamicType.Builder<?> builder, TypeDescription typeDescription, ClassLoader classLoader, JavaModule javaModule) {
return builder;
}

}

Step3 maven pom文件配置打包

1
2
3
4
5
6
7
8
9
10
11
12
13
14
15
16
17
18
19
20
21
22
23
24
25
26
27
28
29
30
31
32
33
34
35
36
37
38
39
40
41
42
43
44
45
46
47
48
49
50
51
52
53
54
55
56
57
<build>
<plugins>
<plugin>
<groupId>org.apache.maven.plugins</groupId>
<artifactId>maven-shade-plugin</artifactId>
<version>3.2.4</version>
<executions>
<execution>
<phase>package</phase>
<goals>
<goal>shade</goal>
</goals>
<configuration>
<transformers>
<transformer implementation="org.apache.maven.plugins.shade.resource.ManifestResourceTransformer">
<manifestEntries>
<Premain-Class>com.github.hezhangjian.demo.agent.AgentMain</Premain-Class>
<Can-Redefine-Classes>true</Can-Redefine-Classes>
<Can-Retransform-Classes>true</Can-Retransform-Classes>
</manifestEntries>
</transformer>
</transformers>
<artifactSet>
<includes>
<include>org.slf4j:slf4j-api</include>
<include>org.apache.logging.log4j:log4j-api</include>
<include>org.apache.logging.log4j:log4j-core</include>
<include>org.apache.logging.log4j:log4j-slf4j-impl</include>
<include>org.apache.logging.log4j:log4j-jcl</include>
</includes>
</artifactSet>
<filters>
<filter>
<artifact>*:*</artifact>
<excludes>
<exclude>META-INF/*.SF</exclude>
<exclude>META-INF/*.DSA</exclude>
<exclude>META-INF/*.RSA</exclude>
</excludes>
</filter>
</filters>
<relocations>
<relocation>
<pattern>org.slf4j</pattern>
<shadedPattern>com.github.hezhangjian.org.slf4j</shadedPattern>
</relocation>
<relocation>
<pattern>org.apache.logging</pattern>
<shadedPattern>com.github.hezhangjian.org.apache.logging</shadedPattern>
</relocation>
</relocations>
</configuration>
</execution>
</executions>
</plugin>
</plugins>
</build>

这里配置了打java agent的包,和打shade包规避类冲突的问题,关于打shade包,可以参考https://www.jianshu.com/p/8171607ce03f

创建一个测试SpringBoot工程

Step1 书写主函数

1
2
3
4
5
6
7
8
9
10
11
12
13
14
15
16
17
18
19
package com.github.hezhangjian.demo.agent.test;

import lombok.extern.slf4j.Slf4j;
import org.springframework.boot.SpringApplication;
import org.springframework.boot.autoconfigure.SpringBootApplication;

/**
* @author hezhangjian
*/
@Slf4j
@SpringBootApplication
public class AgentTestMain {

public static void main(String[] args) {
SpringApplication.run(AgentTestMain.class);
}

}

Step2 修改运行参数,加载java agent

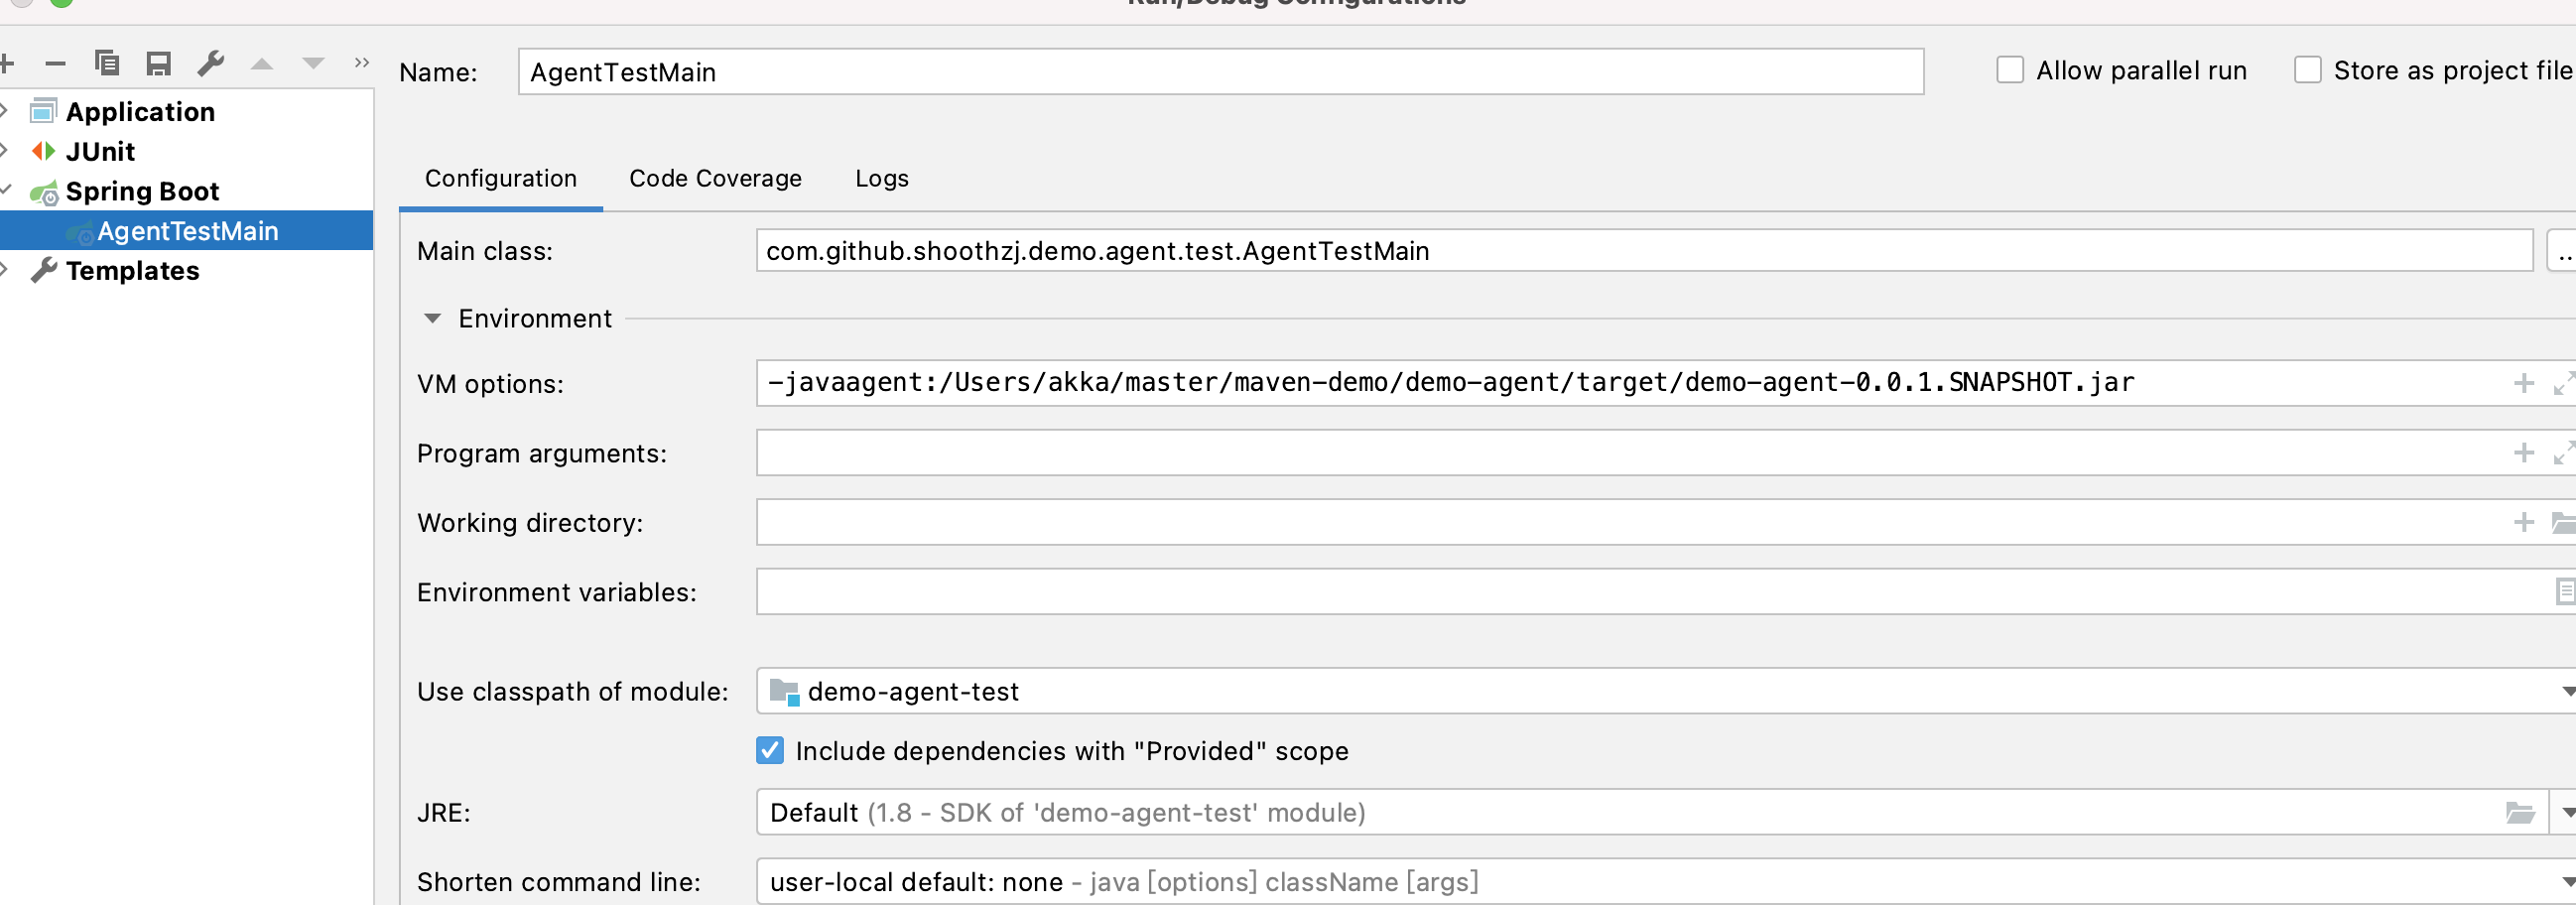
这里我的agent,maven package后的路径在 /Users/akka/master/maven-demo/demo-agent/target/demo-agent-0.0.1.SNAPSHOT.jar

-javaagent:/Users/akka/master/maven-demo/demo-agent/target/demo-agent-0.0.1.SNAPSHOT.jar

image-20201230215511785

Step3 运行结果

image-20201231082704607

可以看到agent已经正常启动

我们在很多场景下会碰到java包冲突的问题:

  • 代码由第三方开发,无法对包名或依赖做管控
  • 跑在同一个进程里的代码,更新步调不一致。比如底层sdk,jvm agent。这些组件更新频率较低

最出名的解决路数还是类加载机制,诸如flink,osgi都给我们提供了很多方案,这些方案都非常重型。在代码可信任的情况下,其中有一个很轻量级的解决方案就是maven-shade包。

举个例子,比方说我想在java agent中打印日志,但是又不希望和业务代码中的log4j等冲突,agent里依赖的pom文件是这样子的:

1
2
3
4
5
6
7
8
9
10
11
12
13
14
15
16
17
18
19
20
21
22
23
24
25
26
27
<dependencies>
<dependency>
<groupId>org.slf4j</groupId>
<artifactId>slf4j-api</artifactId>
<version>1.7.30</version>
</dependency>
<dependency>
<groupId>org.apache.logging.log4j</groupId>
<artifactId>log4j-api</artifactId>
<version>2.13.3</version>
</dependency>
<dependency>
<groupId>org.apache.logging.log4j</groupId>
<artifactId>log4j-core</artifactId>
<version>2.13.3</version>
</dependency>
<dependency>
<groupId>org.apache.logging.log4j</groupId>
<artifactId>log4j-slf4j-impl</artifactId>
<version>2.13.3</version>
</dependency>
<dependency>
<groupId>org.apache.logging.log4j</groupId>
<artifactId>log4j-jcl</artifactId>
<version>2.13.3</version>
</dependency>
</dependencies>

这里我们log4j,slf4j可能用的版本太高或者太低,我们就可以通过打shade包的方式修改log4j和slf4j的包名,避免和业务冲突

1
2
3
4
5
6
7
8
9
10
11
12
13
14
15
16
17
18
19
20
21
22
23
24
25
26
27
28
29
30
31
32
33
34
35
36
37
38
39
40
41
42
43
44
<plugin>
<groupId>org.apache.maven.plugins</groupId>
<artifactId>maven-shade-plugin</artifactId>
<version>3.2.4</version>
<executions>
<execution>
<phase>package</phase>
<goals>
<goal>shade</goal>
</goals>
<configuration>
<artifactSet>
<includes>
<include>org.slf4j:slf4j-api</include>
<include>org.apache.logging.log4j:log4j-api</include>
<include>org.apache.logging.log4j:log4j-core</include>
<include>org.apache.logging.log4j:log4j-slf4j-impl</include>
<include>org.apache.logging.log4j:log4j-jcl</include>
</includes>
</artifactSet>
<filters>
<filter>
<artifact>*:*</artifact>
<excludes>
<exclude>META-INF/*.SF</exclude>
<exclude>META-INF/*.DSA</exclude>
<exclude>META-INF/*.RSA</exclude>
</excludes>
</filter>
</filters>
<relocations>
<relocation>
<pattern>org.slf4j</pattern>
<shadedPattern>com.github.hezhangjian.org.slf4j</shadedPattern>
</relocation>
<relocation>
<pattern>org.apache.logging</pattern>
<shadedPattern>com.github.hezhangjian.org.apache.logging</shadedPattern>
</relocation>
</relocations>
</configuration>
</execution>
</executions>
</plugin>

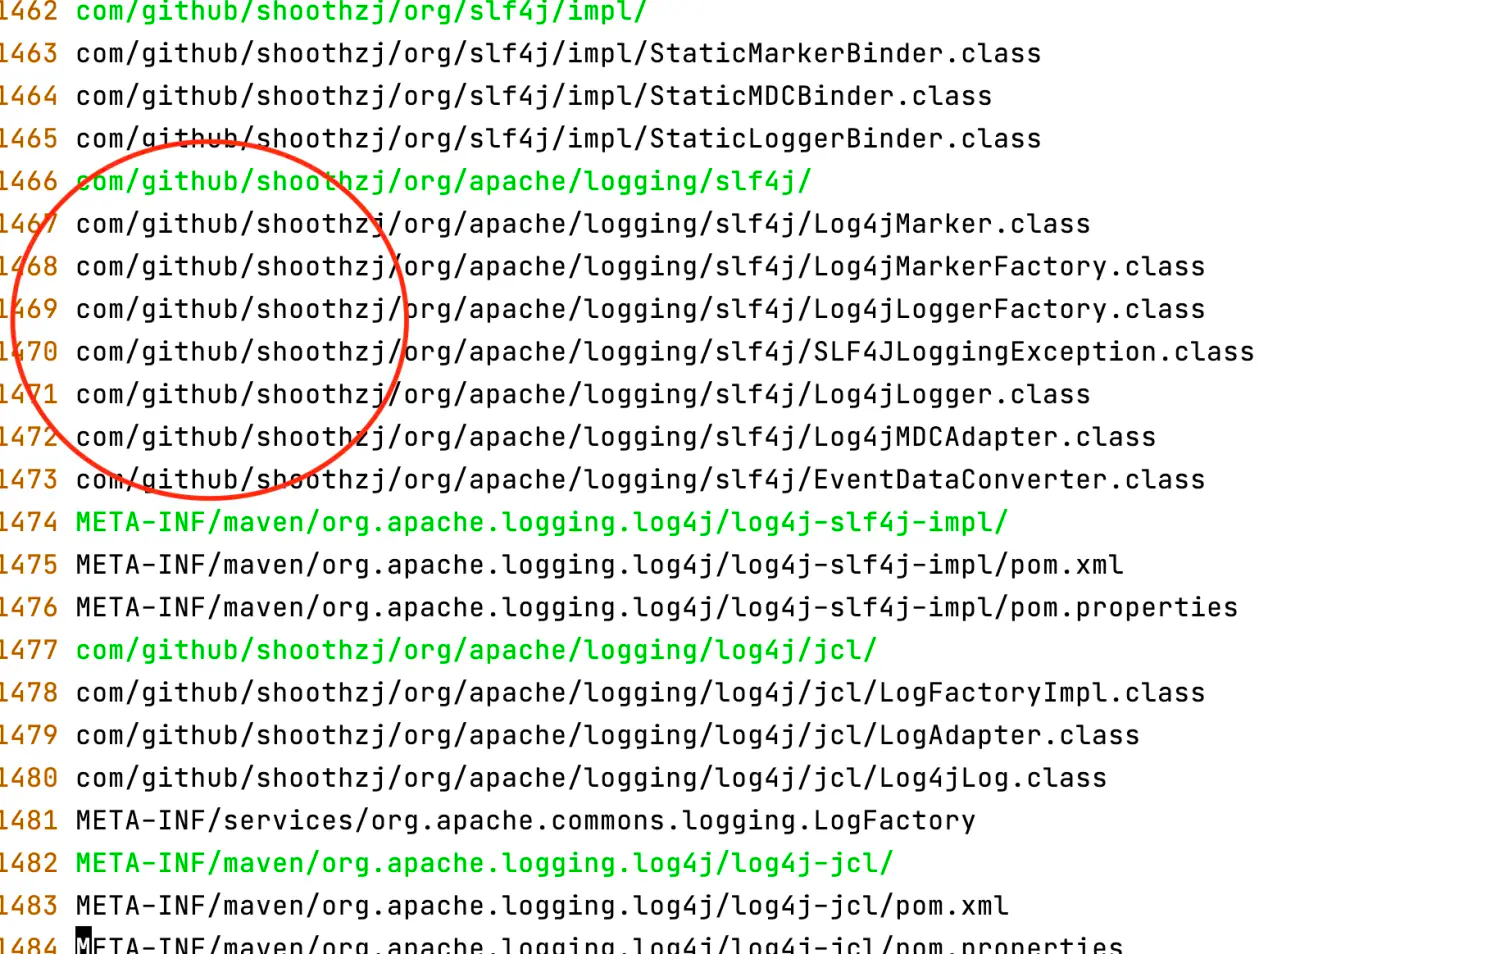
通过上面的配置,artifactSet选择要修改的pom依赖,通过relocation修改包名,达到不冲突的效果。mvn clean package 后查看效果

java-shade-package-result

可以发现,包名已经被修改完成,达到了避免冲突的目的。

性能测试

ThreadLocal一般在多线程环境用来保存当前线程的数据。用户可以很方便地使用,并且不关心、不感知多线程的问题。下面我会用两个场景来展示多线程的问题:

  • 多个线程同时操作一个ThreadLocal
  • 一个线程操作多个ThreadLocal

1. 多个线程同时操作一个ThreadLocal

测试代码分别用于ThreadLocal和FastThreadLocal。 代码如下:

1
2
3
4
5
6
7
8
9
10
11
12
13
14
15
16
17
18
19
20
21
22
23
24
25
26
27
28
29
30
31
32
33
34
35
36
37
package com.github.hezhangjian.demo.netty;

import lombok.extern.slf4j.Slf4j;
import org.junit.Test;

import java.util.concurrent.CountDownLatch;

/**
* @author hezhangjian
*/
@Slf4j
public class ThreadLocalTest {

@Test
public void testThreadLocal() throws Exception {
CountDownLatch cdl = new CountDownLatch(10000);
ThreadLocal<String> threadLocal = new ThreadLocal<String>();
long starTime = System.currentTimeMillis();
for (int i = 0; i < 10000; i++) {
new Thread(new Runnable() {

@Override
public void run() {
threadLocal.set(Thread.currentThread().getName());
for (int k = 0; k < 100000; k++) {
threadLocal.get();
}
cdl.countDown();
}
}, "Thread" + (i + 1)).start();
}
cdl.await();
System.out.println(System.currentTimeMillis() - starTime + "ms");
}

}

上述的代码创建了一万个线程,并将线程名设置在ThreadLocal中,随后获取这个值十万次,然后通过CountDownLoatch计算总耗时。运行这个程序大概耗时1000ms。

接下来,测试FastThreadLocal,代码基本上相似:

1
2
3
4
5
6
7
8
9
10
11
12
13
14
15
16
17
18
19
20
21
22
23
24
25
26
27
28
29
30
31
32
33
34
35
36
37
38
package com.github.hezhangjian.demo.netty;

import io.netty.util.concurrent.FastThreadLocal;
import io.netty.util.concurrent.FastThreadLocalThread;
import lombok.extern.slf4j.Slf4j;
import org.junit.Test;

import java.util.concurrent.CountDownLatch;

/**
* @author hezhangjian
*/
@Slf4j
public class FastThreadLocalTest {

@Test
public void testFastThreadLocal() throws Exception {
CountDownLatch cdl = new CountDownLatch(10000);
FastThreadLocal<String> threadLocal = new FastThreadLocal<String>();
long starTime = System.currentTimeMillis();
for (int i = 0; i < 10000; i++) {
new FastThreadLocalThread(new Runnable() {

@Override
public void run() {
threadLocal.set(Thread.currentThread().getName());
for (int k = 0; k < 100000; k++) {
threadLocal.get();
}
cdl.countDown();
}
}, "Thread" + (i + 1)).start();
}

cdl.await();
System.out.println(System.currentTimeMillis() - starTime);
}
}

跑完之后,用时还是差不多1000ms。这证明了两者在这个场景下没有什么差别

2. 单个线程操作多个ThreadLocal

先看ThreadLocal的:

1
2
3
4
5
6
7
8
9
10
11
12
13
14
15
16
17
18
19
20
21
22
23
24
25
26
27
28
29
30
31
32
33
34
35
36
37
38
39
40
41
42
43
package com.github.hezhangjian.demo.netty;

import lombok.extern.slf4j.Slf4j;
import org.junit.Test;

import java.util.concurrent.CountDownLatch;

/**
* @author hezhangjian
*/
@Slf4j
public class ThreadLocalSingleThreadTest {

@Test
public void testThreadLocal() throws Exception {
CountDownLatch cdl = new CountDownLatch(1);
int size = 10000;
ThreadLocal<String> tls[] = new ThreadLocal[size];
for (int i = 0; i < size; i++) {
tls[i] = new ThreadLocal<String>();
}

new Thread(new Runnable() {
@Override
public void run() {
long starTime = System.currentTimeMillis();
for (int i = 0; i < size; i++) {
tls[i].set("value" + i);
}
for (int i = 0; i < size; i++) {
for (int k = 0; k < 100000; k++) {
tls[i].get();
}
}
System.out.println(System.currentTimeMillis() - starTime + "ms");
cdl.countDown();
}
}).start();
cdl.await();
}

}

上述的代码创建了一万个ThreadLocal,然后设置一个值,随后获取十万次数值,大概耗时2000ms

接下来我们测试FastThreadLocal

1
2
3
4
5
6
7
8
9
10
11
12
13
14
15
16
17
18
19
20
21
22
23
24
public static void test1() {
int size = 10000;
FastThreadLocal<String> tls[] = new FastThreadLocal[size];
for (int i = 0; i < size; i++) {
tls[i] = new FastThreadLocal<String>();
}

new FastThreadLocalThread(new Runnable() {

@Override
public void run() {
long starTime = System.currentTimeMillis();
for (int i = 0; i < size; i++) {
tls[i].set("value" + i);
}
for (int i = 0; i < size; i++) {
for (int k = 0; k < 100000; k++) {
tls[i].get();
}
}
System.out.println(System.currentTimeMillis() - starTime + "ms");
}
}).start();
}

运行结果大概只有30ms; 可以发现存在了数量级的差距。接下来重点分析ThreadLocal的机制和FastThreadLocal为什么比ThreadLocal快

ThreadLocal机制

我们经常会使用到set和get方法,我们分别查看一下源代码:

1
2
3
4
5
6
7
8
9
10
11
12
public void set(T value) {
Thread t = Thread.currentThread();
ThreadLocalMap map = getMap(t);
if (map != null)
map.set(this, value);
else
createMap(t, value);
}

ThreadLocalMap getMap(Thread t) {
return t.threadLocals;
}

首先,获取当前的线程,然后获取存储在当前线程中的ThreadLocal变量。变量其实是一个ThreadLocalMap。最后,查看ThreadLocalMap是否为空,如果为空,则创建一个新的空Map,如果key不为空,则以ThreadLocal为key,存储这个数据

1
2
3
4
5
6
7
8
9
10
11
12
13
14
15
16
17
18
19
20
21
22
23
24
25
26
27
28
29
30
31
32
private void set(ThreadLocal<?> key, Object value) {

// We don't use a fast path as with get() because it is at
// least as common to use set() to create new entries as
// it is to replace existing ones, in which case, a fast
// path would fail more often than not.

Entry[] tab = table;
int len = tab.length;
int i = key.threadLocalHashCode & (len-1);

for (Entry e = tab[i];
e != null;
e = tab[i = nextIndex(i, len)]) {
ThreadLocal<?> k = e.get();

if (k == key) {
e.value = value;
return;
}

if (k == null) {
replaceStaleEntry(key, value, i);
return;
}
}

tab[i] = new Entry(key, value);
int sz = ++size;
if (!cleanSomeSlots(i, sz) && sz >= threshold)
rehash();
}

一般来说,ThreadLocal Map使用数组来存储数据,类似于HashMap。 每个ThreadLocal在初始化时都会分配一个threadLocal HashCode,然后按照数组的长度执行模块化操作,因此会发生哈希冲突。 在HashMap中,使用数组+链表来处理冲突,而在ThreadLocal Map中,也是一样的。 Next索引用于执行遍历操作,这显然具有较差的性能。 让我们再次看一下get方法。

1
2
3
4
5
6
7
8
9
10
11
12
13
public T get() {
Thread t = Thread.currentThread();
ThreadLocalMap map = getMap(t);
if (map != null) {
ThreadLocalMap.Entry e = map.getEntry(this);
if (e != null) {
@SuppressWarnings("unchecked")
T result = (T)e.value;
return result;
}
}
return setInitialValue();
}

同样,首先获取当前线程,然后获取当前线程中的ThreadLocal映射,然后以当前ThreadLocal作为键来获取ThreadLocal映射中的值:

1
2
3
4
5
6
7
8
9
10
11
12
13
14
15
16
17
18
19
20
21
22
23
24
25
private Entry getEntry(ThreadLocal<?> key) {
int i = key.threadLocalHashCode & (table.length - 1);
Entry e = table[i];
if (e != null && e.get() == key)
return e;
else
return getEntryAfterMiss(key, i, e);
}

private Entry getEntryAfterMiss(ThreadLocal<?> key, int i, Entry e) {
Entry[] tab = table;
int len = tab.length;

while (e != null) {
ThreadLocal<?> k = e.get();
if (k == key)
return e;
if (k == null)
expungeStaleEntry(i);
else
i = nextIndex(i, len);
e = tab[i];
}
return null;
}

在相同的设置模式下,数组下标通过模块化获取来获取,否则,如果没有冲突,将遍历数据,因此可以通过分析大致了解以下问题:

  • ThreadLocal Map是存储在Thread下的,ThreadLocal是键,因此多个线程在同一个ThreadLocal上进行操作实际上是在每个ThreadLocal Map线程中插入的一条记录,没有冲突问题;
  • ThreadLocalMap在解决冲突时会通过遍历极大地影响性能。
  • FastThreadLocal通过其他方式解决冲突以优化性能
    让我们继续看看FastThreadLocal如何实现性能优化

译者说:为什么set的时候不适用fastPath(),因为往往大家使用完ThreadLocal都会remove,这个时候,经常是createEntry,而非updateEntry

为什么Netty的FastThreadLocal这么快

Netty分别提供了两类FastThreadLocal和FastThreadLocalThread。 FastThreadLocalThread继承自Thread。 以下也是常用的set和get方法的源代码分析:

1
2
3
4
5
6
7
8
9
10
11
12
13
14
15
16
17
public final void set(V value) {
if (value != InternalThreadLocalMap.UNSET) {
set(InternalThreadLocalMap.get(), value);
} else {
remove();
}
}

public final void set(InternalThreadLocalMap threadLocalMap, V value) {
if (value != InternalThreadLocalMap.UNSET) {
if (threadLocalMap.setIndexedVariable(index, value)) {
addToVariablesToRemove(threadLocalMap, this);
}
} else {
remove(threadLocalMap);
}
}

首先,将值确定为Internal ThreadLocalMap。 UNSET,然后内部ThreadLocalMap也用于存储数据:

1
2
3
4
5
6
7
8
9
10
11
12
13
14
15
16
public static InternalThreadLocalMap get() {
Thread thread = Thread.currentThread();
if (thread instanceof FastThreadLocalThread) {
return fastGet((FastThreadLocalThread) thread);
} else {
return slowGet();
}
}

private static InternalThreadLocalMap fastGet(FastThreadLocalThread thread) {
InternalThreadLocalMap threadLocalMap = thread.threadLocalMap();
if (threadLocalMap == null) {
thread.setThreadLocalMap(threadLocalMap = new InternalThreadLocalMap());
}
return threadLocalMap;
}

可以发现内部ThreadLocal映射也存储在FastThreadLocalThread中。 不同之处在于,它直接使用FastThreadLocal的index属性,而不是使用ThreadLocal的相应哈希值对位置进行建模。 实例化时初始化索引:

1
2
3
4
5
private final int index;

public FastThreadLocal() {
index = InternalThreadLocalMap.nextVariableIndex();
}

Then enter the nextVariableIndex method:

1
2
3
4
5
6
7
8
9
10
static final AtomicInteger nextIndex = new AtomicInteger();

public static int nextVariableIndex() {
int index = nextIndex.getAndIncrement();
if (index < 0) {
nextIndex.decrementAndGet();
throw new IllegalStateException("too many thread-local indexed variables");
}
return index;
}

内部ThreadLocal映射中有一个静态nextIndex对象,用于生成数组下标,因为它是静态的,所以每个FastThreadLocal生成的索引都是连续的。 让我们看看如何在内部ThreadLocal映射中设置索引变量:

1
2
3
4
5
6
7
8
9
10
11
public boolean setIndexedVariable(int index, Object value) {
Object[] lookup = indexedVariables;
if (index < lookup.length) {
Object oldValue = lookup[index];
lookup[index] = value;
return oldValue == UNSET;
} else {
expandIndexedVariableTableAndSet(index, value);
return true;
}
}

索引变量是存储值s的对象数组; 直接使用index作为数组下标进行存储; 如果index大于数组的长度,则将其展开; get方法通过FastThreadLocal中的索引快速读取:

1
2
3
4
5
6
7
8
9
10
11
12
13
public final V get(InternalThreadLocalMap threadLocalMap) {
Object v = threadLocalMap.indexedVariable(index);
if (v != InternalThreadLocalMap.UNSET) {
return (V) v;
}

return initialize(threadLocalMap);
}

public Object indexedVariable(int index) {
Object[] lookup = indexedVariables;
return index < lookup.length? lookup[index] : UNSET;
}

通过下标直接阅读非常快,这是牺牲空间换来的速度

总结

通过以上分析,我们可以知道,当有很多ThreadLocal读写操作时,我们可能会遇到性能问题; 另外,FastThreadLocal实现了O(1)通过空间读取数据的时间; 还有一个问题,为什么不直接使用HashMap(数组+黑红树林)代替ThreadLocalMap。

网关建设

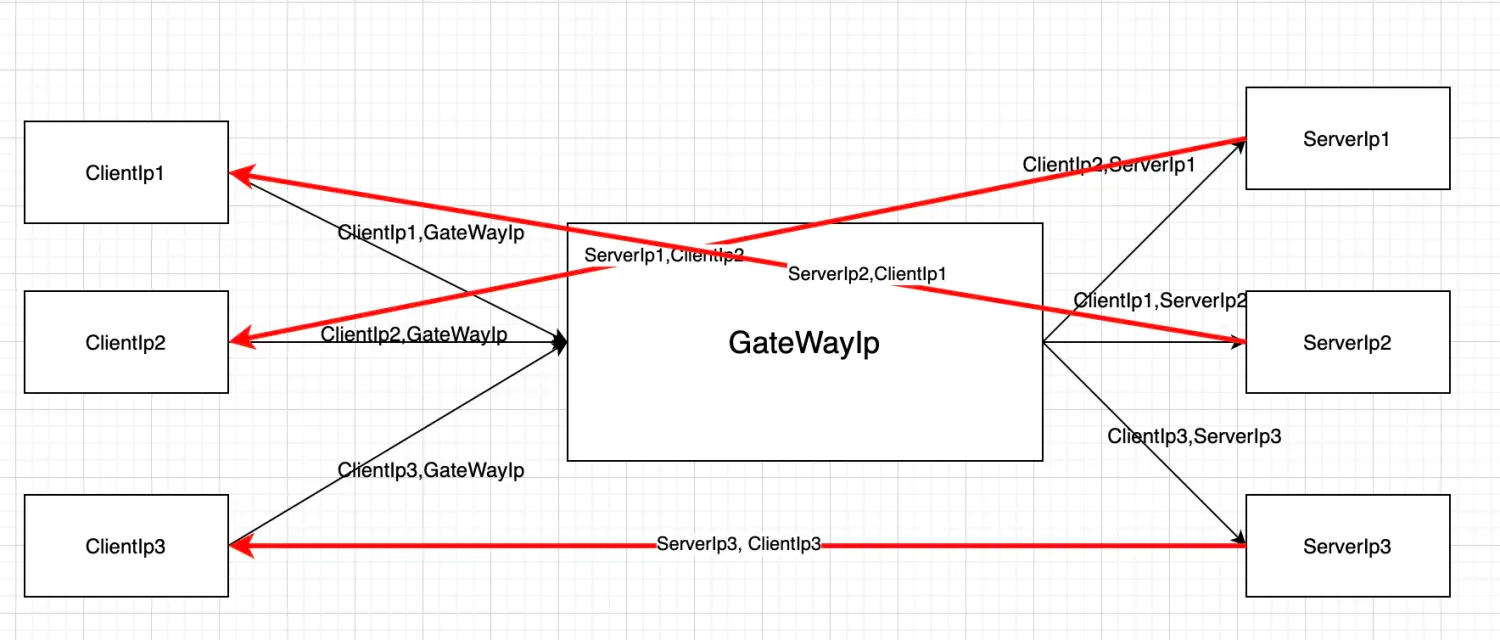
今天给大家介绍三种常见的四层负载均衡、网络转发方案,可用于四层的网关建设。

利用ipvs实现(需要后端服务能连通外部网络)

lb-4-ipvs

该方案需要后端服务器与前端client网络打通,GatewayIp可以采用主备的方式保证高可用

配置都在GatewayIp上,需要配置的如下:

1
2
3
4
ipvsadm -A -u $GatewayIp:$port -s rr -p 600
# -u表示为udp协议,-t表示为tcp协议
# rr 为均衡算法,roundroubin的意思,lc则代表最短连接数
ipvsadm -a -u $GatewayIp:$port -r $ServerIp:$port -m

Ipvs+Iptables实现

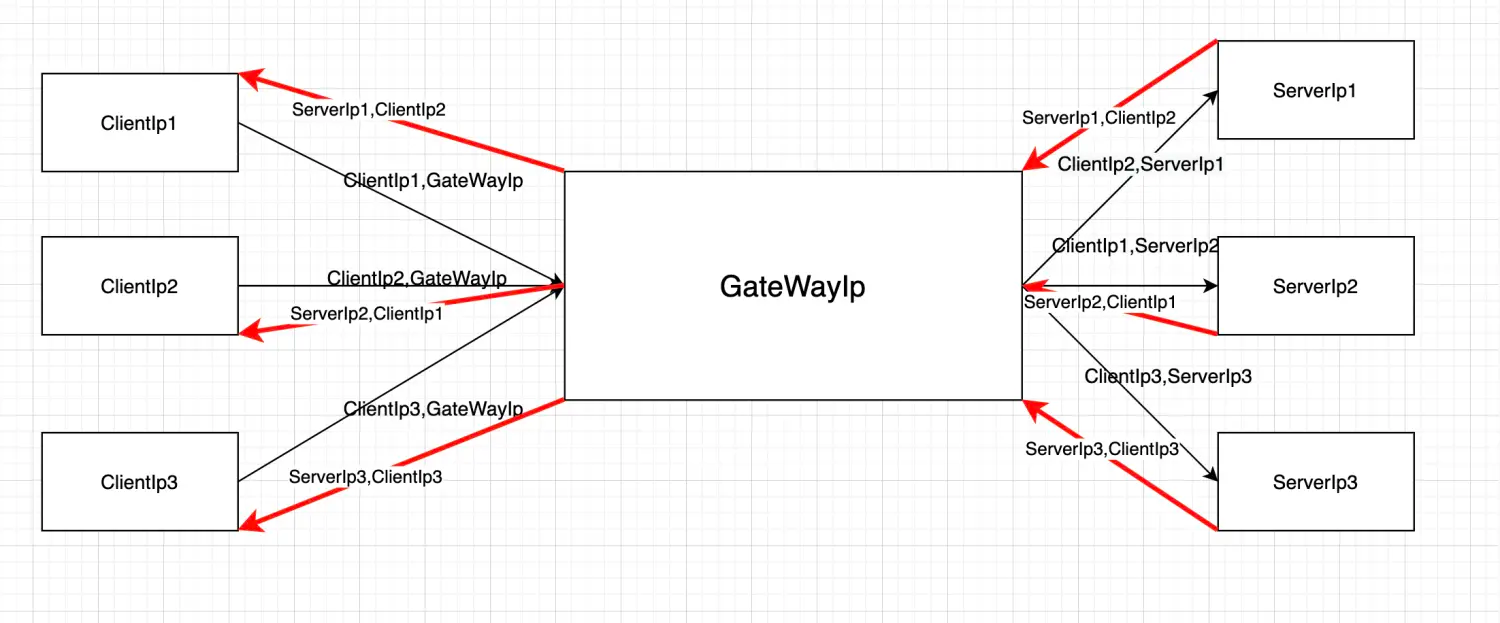
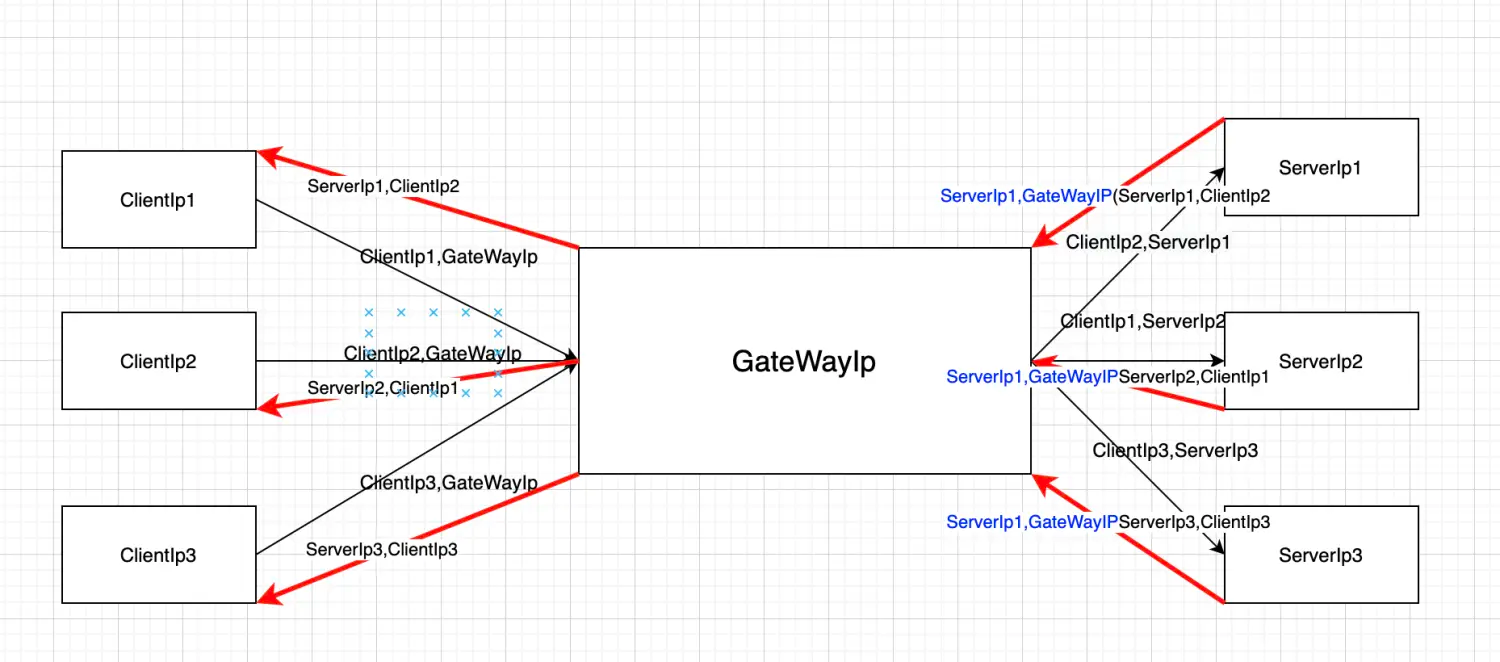
如果您不希望后端Server与客户端面对面打通,那么您可能会喜欢这种方式,将GatewayIP设置为ServerIp的默认网关,再由Snat转换将报文转换出去,这样子Server就不需要与客户端面对面打通了,图示如下:

lb-4-ipvs-iptables

配置默认路由也很简单

1
ip route add 客户端IP网段 via GateWayIp dev eth0

配置iptables

1
iptables -t nat -A POSTROUTING -m iprange -p udp --dst-range $client_ip_range -o eth1  -j SNAT  --to-source $GateWayIp

Ipvs+Iptables+Iptunnel实现

默认路由有一个限制,就是说Server与Gateway都在一个子网内,有过商用经验的大家都知道DMZ之类的说法,就是说应用服务器和网关服务器在诸如安全组,子网等等上需要隔离。假设你需要将应用服务器和网关放在不同的子网,上面的方案就搞不定啊,这个时候需要使用ip隧道的方式来跨子网,图示如下,仅仅后边红色路线的ip发生了变化,原来的报文被ip隧道Wrap:

lb-4-ipvs-iptables-iptunnel

配置ip 隧道倒也不难

1
ip tunnel add $tun_name mode ipip remote $remote_ip local $local_ip ttl 255

总结

以上三种方案均没有单点问题,且都兼容tcp,udp协议。GateWay处的单点问题,通过zk选主、etcd选主,keepalive等 + 浮动IP迁移的方式均能解决。大家可以根据自己的网规网设自由选择

SNI是一个TLS的扩展字段,经常用于访问域名跳转到不同的后端地址。

配置方式如下:打开nginx.conf文件,以ttbb/nginx:nake镜像为例/usr/local/openresty/nginx/conf/nginx.conf

如下为默认的nginx.conf配置

1
2
3
4
5
6
7
8
9
10
11
12
13
14
15
16
17
18
19
20
21
22
23
24
25
26
27
28
29
30
31
32
33
34
35
36
37
38
39
40
41
42
43
44
45
46
47
48
49
50
51
52
53
54
55
56
57
58
59
60
61
62
63
64
65
66
67
68
69
70
71
72
73
74
75
76
77
78
79
80
81
82
83
84
85
86
87
88
89
90
91
92
93
94
95
96
97
98
99
100
101
102
103
104
105
106
107
108
109
110
111
112
113
114
115
116
117

#user nobody;
worker_processes 1;

#error_log logs/error.log;
#error_log logs/error.log notice;
#error_log logs/error.log info;

#pid logs/nginx.pid;


events {
worker_connections 1024;
}


http {
include mime.types;
default_type application/octet-stream;

#log_format main '$remote_addr - $remote_user [$time_local] "$request" '
# '$status $body_bytes_sent "$http_referer" '
# '"$http_user_agent" "$http_x_forwarded_for"';

#access_log logs/access.log main;

sendfile on;
#tcp_nopush on;

#keepalive_timeout 0;
keepalive_timeout 65;

#gzip on;

server {
listen 80;
server_name localhost;

#charset koi8-r;

#access_log logs/host.access.log main;

location / {
root html;
index index.html index.htm;
}

#error_page 404 /404.html;

# redirect server error pages to the static page /50x.html
#
error_page 500 502 503 504 /50x.html;
location = /50x.html {
root html;
}

# proxy the PHP scripts to Apache listening on 127.0.0.1:80
#
#location ~ \.php$ {
# proxy_pass http://127.0.0.1;
#}

# pass the PHP scripts to FastCGI server listening on 127.0.0.1:9000
#
#location ~ \.php$ {
# root html;
# fastcgi_pass 127.0.0.1:9000;
# fastcgi_index index.php;
# fastcgi_param SCRIPT_FILENAME /scripts$fastcgi_script_name;
# include fastcgi_params;
#}

# deny access to .htaccess files, if Apache's document root
# concurs with nginx's one
#
#location ~ /\.ht {
# deny all;
#}
}


# another virtual host using mix of IP-, name-, and port-based configuration
#
#server {
# listen 8000;
# listen somename:8080;
# server_name somename alias another.alias;

# location / {
# root html;
# index index.html index.htm;
# }
#}


# HTTPS server
#
#server {
# listen 443 ssl;
# server_name localhost;

# ssl_certificate cert.pem;
# ssl_certificate_key cert.key;

# ssl_session_cache shared:SSL:1m;
# ssl_session_timeout 5m;

# ssl_ciphers HIGH:!aNULL:!MD5;
# ssl_prefer_server_ciphers on;

# location / {
# root html;
# index index.html index.htm;
# }
#}

}

在最后面添加上

1
2
3
4
5
6
7
8
9
10
11
12
13
14
15
16
17
18
19
20
21
22
stream {

map $ssl_preread_server_name $name {
backend.example.com backend;
default backend2;
}

upstream backend {
server 192.168.0.3:12345;
server 192.168.0.4:12345;
}

upstream backend2 {
server 127.0.0.1:8071;
}

server {
listen 12346;
proxy_pass $name;
ssl_preread on;
}
}

这个时候,我们已经开启了SNI转发的功能,如果你使用backend.example.com的域名访问服务器,就会转发到backend,如果使用其他域名,就会转发到backend2

测试的时候,让我们在/etc/hosts里进行设置,添加

1
127.0.0.1 backend.example.com

然后进行请求

1
curl https://backend.example.com:12346

这里注意请求要使用https,http协议或者是tcp可没有SNI的说法

nginx-sni-backend

发现请求的确实是backend

然后测试请求127.0.0.1:12346

1
curl https://127.0.0.1:12346

nginx-sni-127

准备工作

运行zookeeper

1
docker run -p 2181:2181 -d ttbb/zookeeper:stand-alone

代码参考

1
https://github.com/hezhangjian/maven-demo/tree/master/demo-zookeeper/src/main/java/com/github/hezhangjian/demo/zookeeper

第一次运行代码

创建一个临时有序Znode,程序维持一个小时

1
2
3
4
5
6
7
8
9
10
11
12
13
14
15
16
17
18
19
20
21
22
23
24
25
26
27
28
29
30
31
package com.github.hezhangjian.demo.zookeeper;

import com.github.hezhangjian.javatool.util.CommonUtil;
import com.github.hezhangjian.javatool.util.LogUtil;
import lombok.extern.slf4j.Slf4j;
import org.apache.curator.RetryPolicy;
import org.apache.curator.framework.CuratorFramework;
import org.apache.curator.framework.CuratorFrameworkFactory;
import org.apache.curator.retry.RetryNTimes;
import org.apache.zookeeper.CreateMode;

import java.util.concurrent.TimeUnit;

/**
* @author hezhangjian
*/
@Slf4j
public class TempOrderTest {

public static void main(String[] args) throws Exception {
LogUtil.configureLog();
RetryPolicy retryPolicy = new RetryNTimes(3, 5000);
CuratorFramework client = CuratorFrameworkFactory.builder().connectString("127.0.0.1:2181")
.sessionTimeoutMs(10000).retryPolicy(retryPolicy).build();
client.start();
String path = client.create().withMode(CreateMode.EPHEMERAL_SEQUENTIAL).forPath("/seq", "World".getBytes());
log.info("path is [{}]", path);
CommonUtil.sleep(TimeUnit.HOURS, 1);
}

}

运行第一次

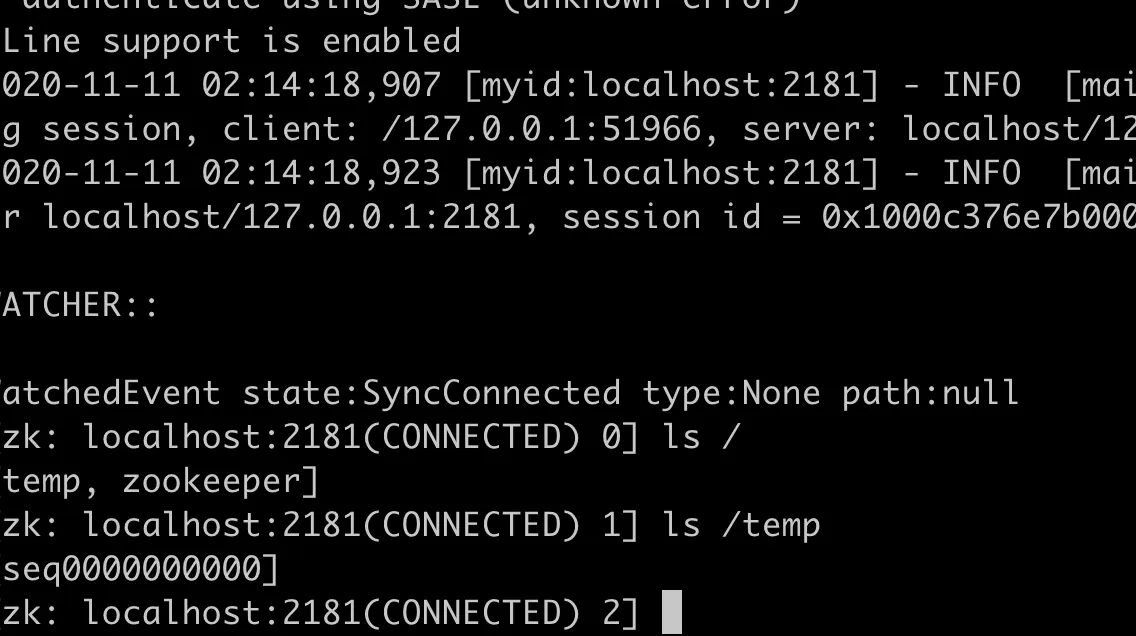
first-run

运行完之后zk

after-first-run

第二次运行代码

创建一个临时有序Znode,创建完成后立刻关闭

1
2
3
4
5
6
7
8
9
10
11
12
13
14
15
16
17
18
19
20
21
22
23
24
25
26
27
28
29
30
31
package com.github.hezhangjian.demo.zookeeper;

import com.github.hezhangjian.javatool.util.CommonUtil;
import com.github.hezhangjian.javatool.util.LogUtil;
import lombok.extern.slf4j.Slf4j;
import org.apache.curator.RetryPolicy;
import org.apache.curator.framework.CuratorFramework;
import org.apache.curator.framework.CuratorFrameworkFactory;
import org.apache.curator.retry.RetryNTimes;
import org.apache.zookeeper.CreateMode;

import java.util.concurrent.TimeUnit;

/**
* @author hezhangjian
*/
@Slf4j
public class TempOrderTest2 {

public static void main(String[] args) throws Exception {
LogUtil.configureLog();
RetryPolicy retryPolicy = new RetryNTimes(3, 5000);
CuratorFramework client = CuratorFrameworkFactory.builder().connectString("127.0.0.1:2181")
.sessionTimeoutMs(10000).retryPolicy(retryPolicy).build();
client.start();
String path = client.create().creatingParentsIfNeeded().withMode(CreateMode.EPHEMERAL_SEQUENTIAL).forPath("/temp/seq", "World".getBytes());
log.info("path is [{}]", path);
client.close();
}

}

运行第二次结果

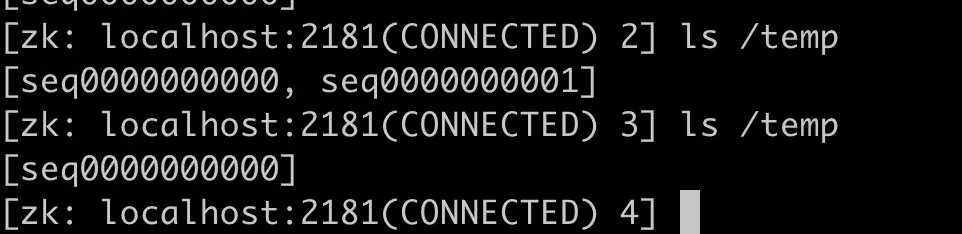
second-run

运行后zk

after-second-run
因为是临时节点,所以存在一会后删除

第三次仍然运行第一次的代码

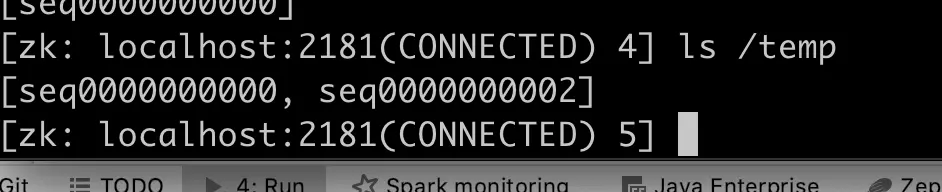
运行第三次结果

third-run

zk

after-third-run

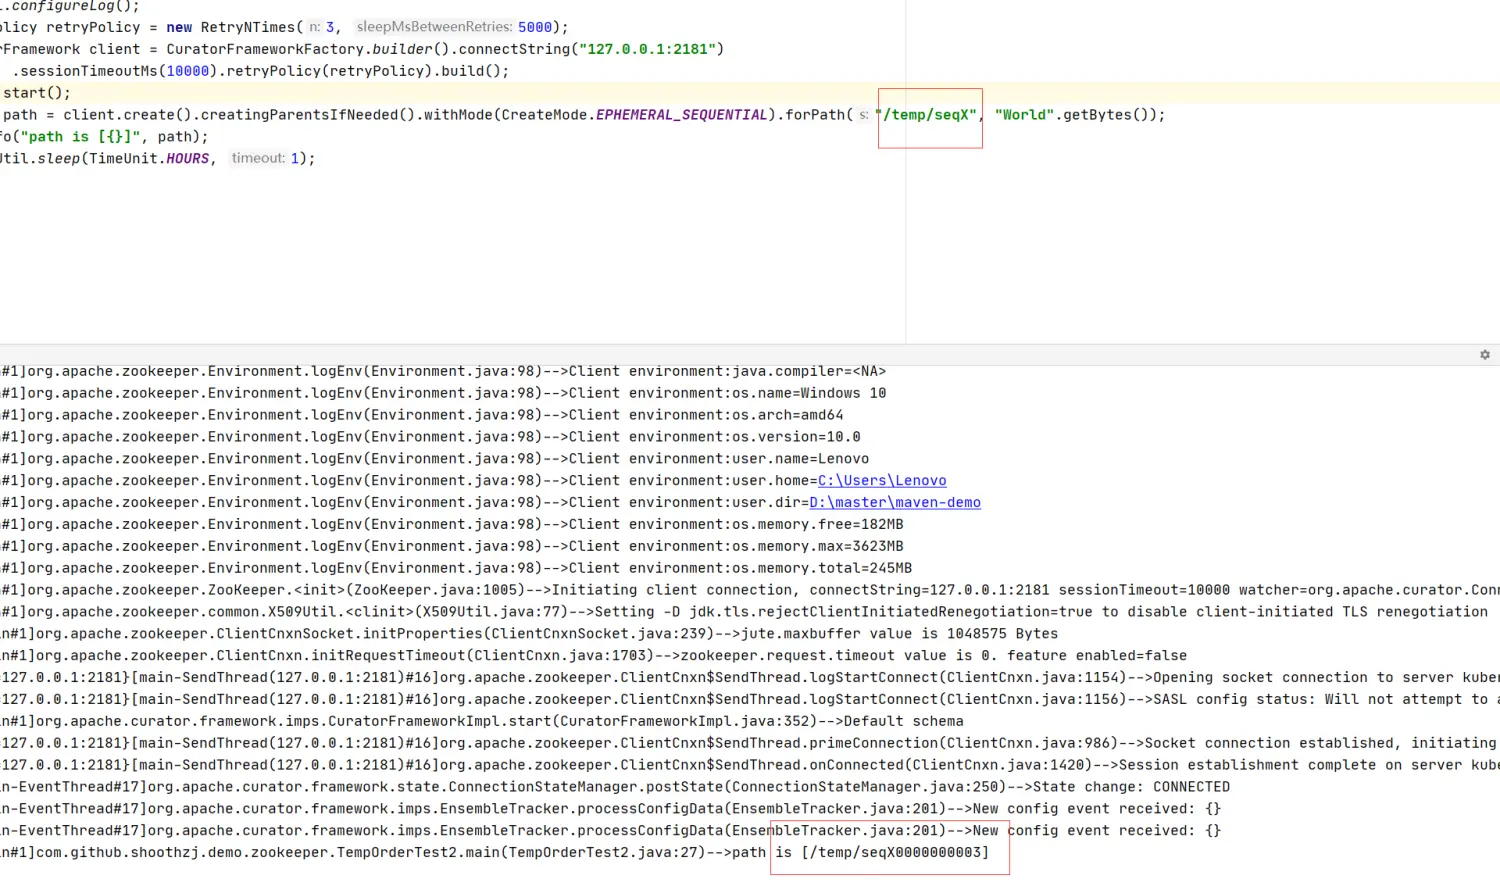
第四次,修改了zkPath的值。值得一提的是,同一个ZkPath下似乎共享临时有序节点的最大值。如果修改zkPath从/temp/seq到/temp/seqX,出现的并不是预估的0000,而是0003

fourth-run
也就是意味着,zk的临时node序号添加是根据父目录下一个标志计数的

zk

after-fourth-run

Hash-based multipath routing

该特性在Linux4.4版本引入,一个难以被大家发现的好处是,基于源地址路由,没有做地址转换,并不会在nf_conntrack中添加记录
它是对源IP和目标IP进行哈希处理(端口不参与哈希的计算)计算选路。配置的命令如下:
weight代表权重

通过网关负载均衡

1
2
3
ip route add default  proto static scope global \
nexthop via <gw_1> weight 1 \
nexthop via <gw_2> weight 1

通过网卡负载均衡

1
2
3
ip route add default  proto static scope global \
nexthop dev <if_1> weight 1 \
nexthop dev <if_2> weight 1

在分布式微服务场景下,有太多的环节可以引发错误的处理(包括丢失或者重复处理),如果业务本身有幂等的特性,我们可以以较低的代价解决大部分问题。

​ 我们假设我们在k8s集群中维护着下面的系统,部署了数个网关实例,数个业务处理服务,一套Kafka集群,数个消费者服务,一个数据库,平时的业务流程是这样子的:

1
客户--->(step1) 网关--->(step2) 业务处理服务-->(step3)消息中间件如Kafka-->(step4)消费者消费-->(step5) 写入数据库

而我们希望做到的是,在海量数据量的情况下,仅仅付出较小的代价,使得客户的每一条消息都存入到我们的数据库,没有丢失或者重复。

在分布式的环境下,有很多地方都会出错,会引发消息的丢失或者重复,我们先假设上述系统没有做太多的可靠性加固,是如下工作的:

1
2
3
4
5
1. 客户简单地发送到网关
2. 网关发送到后端处理服务
3. 后端处理服务接收到请求,做简单校验后直接返回成功/失败,异步发送消息到Kafka
4. 消费者从Kafka拉取消息,拉取到消息就提交,不考虑写入数据库的成功或失败
5. 写入到数据库

举几个例子,那么我们会碰到类似这样的问题:

1
2
3
1. 客户发送到网关不考虑结果,即时我们返回失败,也不处理。显然会丢失消息,我们的系统并不能保证100%的消息处理成功
2. 网关在与业务处理服务的TCP的四次挥手阶段处理异常,导致业务处理成功(已发送到Kafka),但实际返回客户失败。导致消息重复
3. 消费者拉取到消息后,写入数据库失败,但此时offset已提交。消息丢失

我们先不考虑客户,先看平台侧,我们构筑了一个什么样的系统呢?

它既不能保证至少发一次(AT_LEAST_ONCE),也不能保证最多发一次(AT_MOST_ONCE),我们构筑了一个即可能多发也有可能少发的系统,当然,现在的基础设施很好,照着这样跑,可能丢失的数据也就是万中一二,但我们做技术,还是要有点追求,实现别人难以实现的事情才是我们的竞争力。

平台如何实现精确一次

实现端到端一次的技术核心是两阶段提交,以上述业务流程为例,实现了两阶段提交的流程应该是这样的:

1
2
3
4
1. 消费者从Kafka消费到一批数据,但并不commit提交
2. 消费者向数据库prepare这批数据
3. 消费者向Kafka提交Offset
4. 消费者向数据库commit这批数据

按照这个流程,还会有一些异常场景,比如

1
2
1.消费者向Kafka提交Offset后,突然宕机,重启的消费者无法恢复事务,消息丢失
2.消费者commit失败,消息丢失

第二种情况属于极端场景,因为我们执行的业务简单,只是insert操作,prepare成功,commit失败,可以打日志,报告警人工处理。但第一种情况是需要自动化解决的,因为我们不能对每条提交失败的事务都人工处理。那么我们需要的是:

我们需要消费者在进程级失败的时候,可以判断处于prepare阶段的事务是否需要恢复,这个可以对比Mysql,Mysql也使用了两阶段提交协议,每次重启的时候会判断redolog处于prepare状态,binlog是否完整,如果binlog完整,则恢复。这里redo log就像我们的数据库,binlog就是kafka。但我们现在的业务没有主键,每条消息都是独立的,我们无法区分,那些是要被正常放弃的事务,那些是重启的时候需要恢复的事务。这种情况我们无法处理。

但如果这时候我们有了主键,我们有了幂等,我们只要做到至少一次就可以保证平台达到端到端一次。因为多次向数据库插入相同的数据,并不会发生什么事。

平台如何实现至少一次

实现至少一次的核心技术是如果处理不成功就打死不提交,报告警等人工操作都不提交! 其他队列,缓存区,滑窗只不过是提升性能的手段。

1
2
3
4
1. 消费者从Kafka消费到一批数据,但并不commit提交
2. 消费者向数据库prepare这批数据
3. 消费者向数据库commit这批数据
4. 消费者向Kafka提交Offset

接下来我们来看与客户的通信,这次我们先看如何做到至少一次

与客户侧通信如何做到至少一次

前面说到客户可能不处理你的返回值,碰到这样的客户其实是你赚了,客户的系统连这个都不重视,那想必也不会在意你是否做到了端到端一次吧,丢失了数据想必也不是特别在意。一个端到端一次的系统,一定需要输入端和输出端的配合,正如我前面举例:

1
客户发送到网关不考虑结果,即时我们返回失败,也不处理。显然会丢失消息,

那么我们也需要客户的配合,客户检测到我们回复的结果是失败,重试一下,确保成功。现在我们已经实现了至少一次了吗?

没有,还记得我前面说的这个吗?

1
3. 后端处理服务接收到请求,做简单校验后直接返回成功/失败,异步发送消息到Kafka

我们需要后端处理服务接收到请求后,确保发送Kafka成功,再回复用户成功

与客户侧通信做到精确一次

假设前面的方案我都已经做了,在什么情况下我们会重复呢?

1
2
3
1. 网关在与业务处理服务的TCP的四次挥手阶段处理异常,导致业务处理成功(已发送到Kafka),但实际返回客户失败。导致消息重复
2. 业务处理服务与网关的TCP的四次挥手阶段处理异常,导致业务处理成功,但实际返回客户失败
3. 客户的系统重启,成功应答并没有成功传达

为了实现两阶段提交协议,客户在发送前需要确认这个消息是否已经处理过了,但是没有主键,我们无法提供给客户这样子的信息。(如果考虑性能的话,整个系统端到端的事务,基本与高吞吐无缘了)
而且,两阶段提交协议也需要客户做很多的工作,实际中也很难落地。

总结

  • 我们需要一个业务上的主键,它可以是组合主键(mysql, mongo),或者是single主键(更适合cassandra和redis),使得我们可以提供更高QOS的保证,为此,仅需付出极小的代码,可能仅仅是数据库的主键一致性检查。
  • 如果系统和业务无关,任谁也难言真正的端到端一次。Flink无疑是流系统里面端到端一次的佼佼者,但上面也有着诸多限制。

备注

  • 事实上,要实现精确一次,系统的每两个环节之间都要做两阶段提交,为行文方便,省去网关,业务处理服务之间的两阶段提交
  • 推荐书籍 《基于Apache Flink的流处理》

灵活部署要求

常见的微服务开发下,可能会对微服务的日志打印有一些要求.常见的一种模式是,将日志文件挂载在主机路径中,然后在主机上启动filebeat收集日志.

以我的一个demo工程rabbitmq-adapt为例:

1
2
容器内打印路径: /opt/sh/logs/file.log
容器外挂载路径: /opt/log/rabbitmq/file.log

但是这样子,如果我们需要在一个虚拟机上跑两个rabbitmq-adapt的时候,日志路径会重复,这种情况下,不仅我们在虚拟机很难定位问题,而且filebeat也很难给日志标记上不同实例的标签.

所以首先,我们得把日志路径按pod实例的方式隔离,选择k8s中HOSTNAME环境变量作为文件路径前缀是一个不错的选择

1
2
3
4
5
6
7
8
9
10
11
12
13
14
15
16
17
18
19
20
21
22
akka@AkkadeMacBook-Pro ~ % kubectl exec -it rabbitmq-58c5f4ff6b-zthg4 bash
[root@rabbitmq-58c5f4ff6b-zthg4 /]# env
LANG=en_US.UTF-8
HOSTNAME=rabbitmq-58c5f4ff6b-zthg4
KUBERNETES_PORT_443_TCP_PROTO=tcp
KUBERNETES_PORT_443_TCP_ADDR=10.96.0.1
KUBERNETES_PORT=tcp://10.96.0.1:443
POD_NAME=rabbitmq-58c5f4ff6b-zthg4
PWD=/
HOME=/root
NODE_NAME=minikube
KUBERNETES_SERVICE_PORT_HTTPS=443
KUBERNETES_PORT_443_TCP_PORT=443
KUBERNETES_PORT_443_TCP=tcp://10.96.0.1:443
TERM=xterm
SHLVL=1
KUBERNETES_SERVICE_PORT=443
PATH=/usr/local/sbin:/usr/local/bin:/usr/sbin:/usr/bin:/sbin:/bin
POD_IP=172.17.0.2
KUBERNETES_SERVICE_HOST=10.96.0.1
LESSOPEN=||/usr/bin/lesspipe.sh %s
_=/usr/bin/env

k8s subPathExpr方案: 查阅资料,官方推荐的是这个方案

这个时候,你的映射关系是 /opt/sh/logs <==> /opt/log/rabbitmq/${POD_NAME}

1
2
3
4
5
6
7
8
9
10
11
12
13
14
15
16
17
18
19
20
21
22
23
24
25
26
27
28
29
30
31
32
33
34
35
36
37
38
39
40
41
42
43
44
45
46
47
48
49
50
51
52
53
54
55
56
57
58
59
60
61
62
63
apiVersion: apps/v1
kind: Deployment
metadata:
name: rabbitmq
labels:
app: rabbitmq
spec:
replicas: 2
selector:
matchLabels:
app: rabbitmq
template:
metadata:
labels:
app: rabbitmq
spec:
containers:
- name: rabbitmq
env:
- name: NODE_NAME
valueFrom:
fieldRef:
fieldPath: spec.nodeName
- name: POD_NAME
valueFrom:
fieldRef:
fieldPath: metadata.name
- name: POD_IP
valueFrom:
fieldRef:
fieldPath: status.podIP
image: hezhangjian/rabbitmq-adapt:0.0.1
readinessProbe:
httpGet:
path: /readiness
port: 8083
initialDelaySeconds: 3
periodSeconds: 3
volumeMounts:
- mountPath: /opt/sh/log
name: rabbitmq-log
# subPath的方案很好,但对版本号要求很高,>=1.14
subPathExpr: $(POD_NAME)
resources:
limits:
memory: 4G
cpu: 1000m
requests:
memory: 500M
cpu: 250m
securityContext:
privileged: true
volumes:
# - name: rabbitmq-data
# hostPath:
# path: "/Users/akka/rabbitmq"
# type: DirectoryOrCreate
- name: rabbitmq-log
hostPath:
path: /opt/log/rabbitmq
type: DirectoryOrCreate


可以达到如下的效果:

1
minikube/                  rabbitmq-6df8f7565c-kh2h6/ rabbitmq-6df8f7565c-ss92l/

log4j2环境变量隔离方案:适用于在你的k8s版本还不够的情况下

这个时候,你的文件映射关系还是 /opt/sh/logs <==> /opt/log/rabbitmq

但是真正在打印日志的时候,把日志都打印到/opt/sh/logs/${POD_NAME}下,这样子也可以在一台vm上跑多个实例

1
2
3
4
5
6
7
8
9
10
11
12
13
14
15
16
17
18
<?xml version="1.0" encoding="UTF-8" ?>

<Configuration status="warn" monitorInterval="10">
<Appenders>
<Console name="Console" target="SYSTEM_OUT">
<PatternLayout pattern="%d{yyyy-MM-dd,HH:mm:ss,SSSXXX}(%r):%4p%X[%t#%T]%l-->%m%n"/>
</Console>
<File name="FILE" fileName="${env:HOSTNAME}/file.log">
<PatternLayout pattern="%d{yyyy-MM-dd,HH:mm:ss,SSSXXX}(%r):%4p%X[%t#%T]%l-->%m%n"/>
</File>
</Appenders>
<Loggers>
<Root level="INFO">
<AppenderRef ref="Console"/>
<AppenderRef ref="FILE"/>
</Root>
</Loggers>
</Configuration>

我们解决了两个容器在一个vm上打印日志的问题,紧接着,我们要分析filebeat的能力,filebeat能否区分这两个路径,把这两个路径打上不同的标签

运行并配置好filebeat,配置文件如下

1
2
3
4
5
6
7
8
9
10
11
12
13
14
15
16
17
18
19
20
21
22
23
filebeat.inputs:
- type: log
enabled: true
paths:
- /opt/sh/collect/log/es/*/*.log
tags: ["es"]
filebeat.config.modules:
path: ${path.config}/modules.d/*.yml
reload.enabled: false
reload.period: 10s
setup.template.settings:
index.number_of_shards: 1
fields:
fields_under_root: true
setup.kibana:
output.elasticsearch:
hosts: ["localhost:9200"]
processors:
- add_host_metadata: ~
- add_docker_metadata: ~
- add_kubernetes_metadata:
kube_config: /opt/sh/collect/log/config
logging.level: debug

,查询收集上来的数据

1
2
curl 127.0.0.1:9200/filebeat-7.5.1-2020.01.23-000001/_search?pretty
收集上来的数据存在hostname字段,能区分代表单个实例的信息.

使用ES processor添加实例id信息

1
2
3
4
5
6
7
8
9
10
11
12
curl -X PUT "localhost:9200/_ingest/pipeline/attach_instance?pretty" -H 'Content-Type: application/json' -d'
{
"processors": [
{
"grok": {
"field": "log.file.path",
"patterns": ["/opt/sh/collect/log/es/%{WORD:instanceId}/es.log"]
}
}
]
}
'

然后修改filebeat配置文件

1
2
3
4
5
6
7
8
9
10
11
12
13
14
15
16
17
18
19
20
21
22
23
24
filebeat.inputs:
- type: log
enabled: true
paths:
- /opt/sh/collect/log/es/*/*.log
tags: ["es"]
filebeat.config.modules:
path: ${path.config}/modules.d/*.yml
reload.enabled: false
reload.period: 10s
setup.template.settings:
index.number_of_shards: 1
fields:
fields_under_root: true
setup.kibana:
output.elasticsearch:
hosts: ["localhost:9200"]
pipeline: attach_instance
processors:
- add_host_metadata: ~
- add_docker_metadata: ~
- add_kubernetes_metadata:
kube_config: /opt/sh/collect/log/config
logging.level: debug

查询结果就会出现在instanceId字段

总结

三种方案均可以方便地实现同一vm上部署两个容器. 方案一只需要修改tosca模板,但要1.14版本才支持.方案二需要修改少量代码.

但前两种均不适合配置了hostnetwork,即独占主机的网络,原因,主机网络独占之后,两个容器的hostname都相同,实际中,已经独占网络的容器,还需要部署在一个节点的需求,应该比较少.

如果有,可以使用在es处处理文件路径,加上instanceId字段

0%